Many third-party (not us) software providers have products that will receive SNMP traps. If you’d like to configure our PACs to send SNMP traps or get read/written to by one of these software packages, you’ll find all the configuration settings documented in form 1465, our Mem Map Protocol Guide.
In this shorter post, Ben walks you through the basic PAC Manager settings you need to get your traps configured ASAP.
There are also PAC Control commands, in the “I/O Unit - Event Message” category, that help you programatically change the messages and message states, based on what’s happening in your strategy. There are also other discussions like this one which includes other SNMP options/alternatives and even a chart that listens for traps coming from another device.
This 101 post is meant to help you get your PAC configured to send traps, and includes some OptoScript to write the settings mentioned above to the mem map area of your PAC, and also includes so helpful links for SNMP basics – like how to get and load a MIB into your software so it can read/write from/to our PACs.
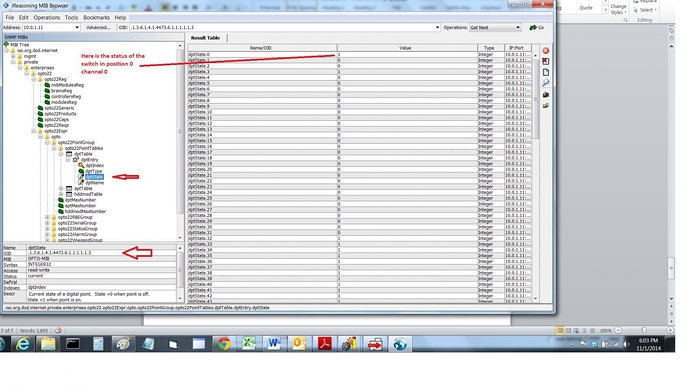
The example below concludes by showing how to see live IO data via SNMP from the PAC Rx Controller using iReasoning software.
We’ll also see how to configure PAC traps from within the control strategy without having to do any setup in PAC Manager.
The example strategy uses the PAC Learning Center, using one digital input in the first position of the rack. Adjust as needed for your particular setup.
Outline
- Gain an understanding of SNMP
- Download a SNMP utility that can listen for traps and will view live data
- Configure and run strategy in the PAC Controller, listening for traps from the utility
- Download the Opto 22 MIB files
- Load the MIB file into the utility and read live IO data from the controller
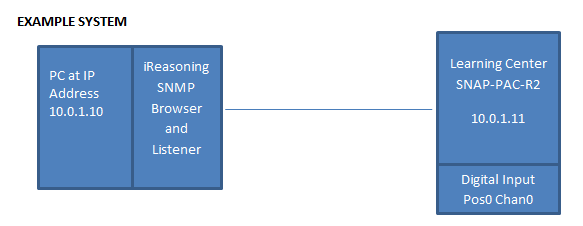
WHAT YOU’LL NEED
A PC with an Ethernet IP address set to 10.0.1.10.
PAC Project 9.4 or newer
iReasoning MIB Browser software
Learning Center (or equivalent) with PAC Controller set to IP Address 10.0.1.11 and One Digital Input point in position 0 channel 0
A working Ethernet connection between the PC and the Learning Center PAC Controller
GAIN AN UNDERSTANDING OF SNMP
Check out wiki on SNMP
[B][U]http://en.wikipedia.org/wiki/Simple_Network_Management_Protocol[/U][/B]
Check out this tutorial from a monitoring and controls company. Most of the information is on this first link, but check out the second link for more of a step-by-step tutorial.
[B][U]http://www.dpstele.com/layers/l2/snmp_tutorial_what_is_snmp.php[/U][/B]
[B][U]http://www.dpstele.com/white-papers/snmp-mib/index.php[/U][/B]
DOWNLOAD SNMP UTILITY
iReasoning has a free MIB Browser that will also listen for and send SNMP traps.
The free MIB Browser Personal Edition works fine for this example.
[B][U]Network Management / Network Monitoring / SNMP Monitoring / MIB Browser
CONFIGURE AND RUN THE STRATEGY
Sending a SNMP trap requires:
• Set the proper SNMP settings within the PAC Controller (often set using PAC Manager, but this time in the strategy)
• Wait for the event to send the trap
• Set the trap message and send the trap
• Wait to the event to reset
• Reset the trap
• Run the iReasoning utility to listen for the trap
SET THE SNMP SETTINGS
PAC Manager is often used to configure the SNMP settings. In our case we want to make all the settings inside the control strategy. If we have to replace a controller the only thing necessary is to assign the IP address.
Since all the SNMP settings are identified by an MMP address we can use the WriteStrToIoUnitMemMap and the WriteNumToIoUnitMemMap PAC Control commands to set all the configuration parameters.
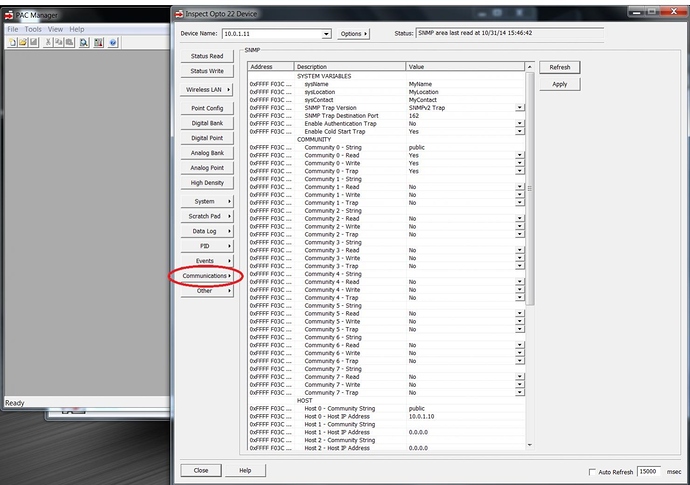
Below is a screen shot from PAC Manager showing the SNMP settings that we want to write to the mem map. This screen shot was taken after running and being set by the program. Before running the program all the settings were blank (or at default).
Settings worth noting:
SNMP Trap Designation Port – port 162 is default for SNMP (FYI - here is a list of standard port numbers List of TCP and UDP port numbers - Wikipedia ) It may be that your PC or other listening device will not let you use 162. In that case change it here and in the listening program.
Enable Cold Start Trap – this tells the PAC Controller to send out a trap message when a Cold Start is performed, that is, a power up.
Community 0 – Community 0 is one of the 8 community groups available. In our example we are only using this one. Setting the String to public is typical. We will set the String for the HOST setting to public so they match. The Read, Write and Trap settings are set to enable.
In the PAC Strategy SetIoUnitEventMsgText and SetIoUnitEventMsgState command the EventMessageNumber is passed to the command, and that is actually the same as the Community number here. So in our strategy example we will pass a 0, for Community 0.
Host 0 Community String – the host match the COMMUNITY 0 group string, “public”.
Host 0 Host IP Address - this IP setting is the address of the listening device.
PAC CONTROL STRATEGY
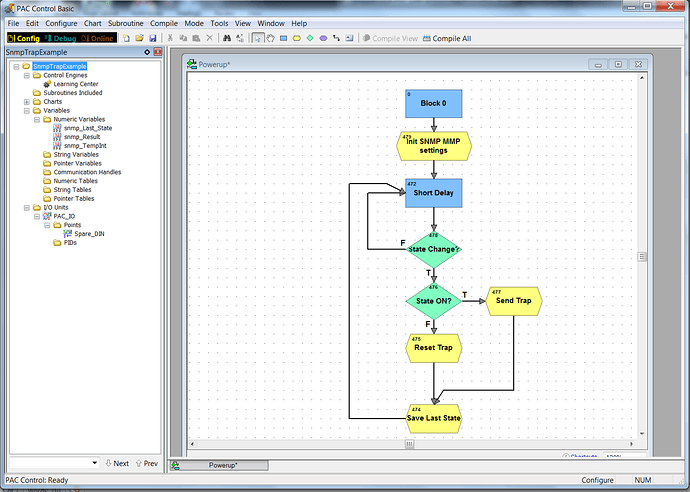
Here is the chart in the PAC Control strategy. The script block “Init SNMP MMP settings” is where all the SNMP settings are written to the PAC Controller. The code for that block follows.
“Init SNMP MMP settings” SCRIPT BLOCK
  // this block configures the settings for sending SNMP Traps from the controller/IO Unit
  // these settings are typically done using PAC Manager, but are put in code here to simplify setup
  // From PAC Manager, the setting are found using the
  //    Inspect window, Communications / SNMP
  //    Inspect window, Events , Event Messages

  // The Cold Start Trap, if enabled, will send out a trap each time the controller is power cycled

  // These settings are written to flash, but since the controller is not restarted some of the setting changes may not take
  //  affect immediately.  It is assumed that the user will power cycle controller 2 times after making changes.
  //  one time for this block to be executed, and another time to create a power cycle.


  //** settings in Communications/SNMP section in PAC Manager
  // SNMP Sys Name (this setting is not critical)
  snmp_Result = WriteStrToIoUnitMemMap(PAC_IO, 0xFFFFF03c0000, "MyName");
  // SNMP Sys Location (this setting is not critical)
  snmp_Result = WriteStrToIoUnitMemMap(PAC_IO, 0xFFFFF03c0020, "MyLocation");
  // SNMP Sys Contact (this setting is not critical)
  snmp_Result = WriteStrToIoUnitMemMap(PAC_IO, 0xFFFFF03c0040, "MyContact");


  // SNMP Trap Version  (0=v1, 1=v2)
  snmp_Result = WriteNumToIoUnitMemMap(PAC_IO, 0xFFFFF03c030c, 1);
  // SNMP Trap Destination Port  (official standard is 162, sometimes it is not available so a different number may be used)
  snmp_Result = WriteNumToIoUnitMemMap(PAC_IO, 0xFFFFF03c0308, 162);
  // SNMP Authentication Trap 0=disabled 1=enabled
  snmp_Result = WriteNumToIoUnitMemMap(PAC_IO, 0xFFFFF03c0060, 0);
  // SNMP Cold Start Trap 0=disabled 1=enabled
  snmp_Result = WriteNumToIoUnitMemMap(PAC_IO, 0xFFFFF03c0064, 1);

  // SNMP public community 0 settings : name, read, write, and trap enables
  snmp_Result = WriteStrToIoUnitMemMap(PAC_IO, 0xFFFFF03c0068, "public"); // set to public - commonly used.
  snmp_Result = WriteNumToIoUnitMemMap(PAC_IO, 0xFFFFF03c007c, 1);  // read - yes
  snmp_Result = WriteNumToIoUnitMemMap(PAC_IO, 0xFFFFF03c0080, 1);  // write - yes
  snmp_Result = WriteNumToIoUnitMemMap(PAC_IO, 0xFFFFF03c0084, 1);  // trap - yes


  // SNMP Host 0 settings : name, ip address
  snmp_Result = WriteStrToIoUnitMemMap(PAC_IO, 0xFFFFF03c0168, "public");     // set to public - commonly used.
  snmp_TempInt = IpAddressStringToInt32("10.0.1.10");    // convert ip into an integer
  snmp_Result = WriteNumToIoUnitMemMap(PAC_IO, 0xFFFFF03c017c, snmp_TempInt); // set ip address


  //** settings in Event Messages section in PAC Manager
  // Event Messages, Enable SNMP Trap  (0=disabled, 1=enabled)
  snmp_Result = WriteNumToIoUnitMemMap(PAC_IO, 0xFFFFF1200024, 1);
  // Event Messages, Trap Period (seconds)
  snmp_Result = WriteNumToIoUnitMemMap(PAC_IO, 0xFFFFF1200028, 0);
  // Event Messages, Trap Type
  snmp_Result = WriteNumToIoUnitMemMap(PAC_IO, 0xFFFFF120002C, 0);
  // Event Messages, Priority (0=High, 1=Low)
  snmp_Result = WriteNumToIoUnitMemMap(PAC_IO, 0xFFFFF1200030, 0);


  // ***  Write the Settings to Flash
  snmp_Result = WriteNumToIoUnitMemMap(PAC_IO, 0xFFFFF0380000, 3);
SEND THE TRAP
The remaining blocks check the state of the digital input. When the input goes from off to on the trap is set. When the input goes from on to off the trap is reset. Toggling the digital input on the Learning Center will send the trap each time the input state goes high.
“Send Trap” SCRIPT BLOCK
First we set the text message that goes out with the trap. Then we set the state of trap 0 to a 1 which sends the trap.
  // Set the SNMP message and state so the trap fires
  snmp_Result = SetIoUnitEventMsgText(PAC_IO, 0, "Switch is ON");
  snmp_Result = SetIoUnitEventMsgState(PAC_IO, 0, 1);
“Reset Trap” SCRIPT BLOCK
Reset the state of trap 0 to a 0 which resets the trap for the next time.
  // Reset the SNMP state so the trap resets
  snmp_Result = SetIoUnitEventMsgState(PAC_IO, 0, 0);
RUN THE iREASONING LISTENING UTILITY
Run the iReasoning MIB Browser program and select Tools / Trap Receiver.
- Make sure your PC is on the network with the PAC Controller. Check this by doing a ping from the PC to the PAC Controller.
- The IP address of the PC must match the HOST Host 0 IP Address setting in the PAC Controller.
- The port number setting for the iReasoning listener must match the SNMP Trap Destination Port setting in the PAC Controller. This defaults to port 162. You can change the port number in the iReasoning program in the Trap Receiver Settings screen.
Toggle the switch on the Learning Center to trigger the trap in the strategy.
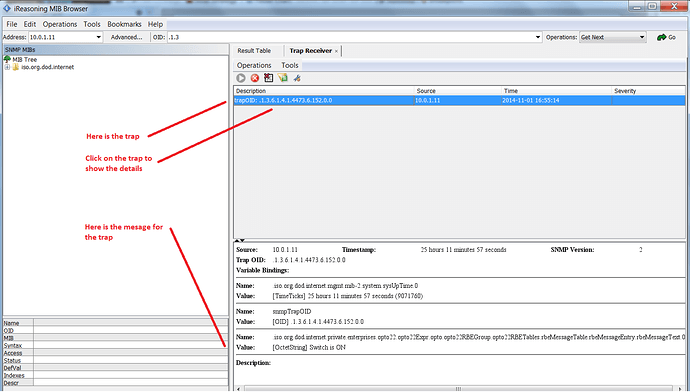
Below is a screenshot of the trap displayed in the iReasoning program.
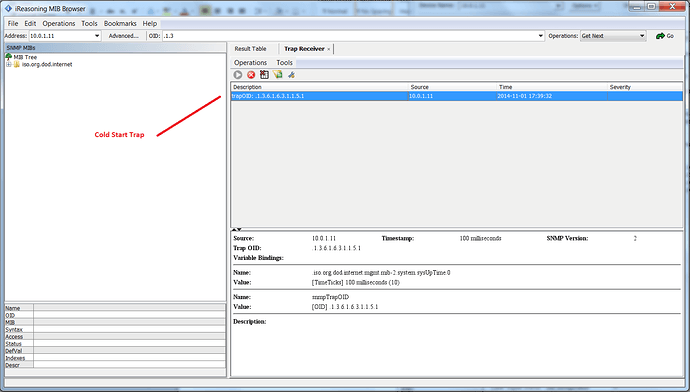
If you Power Cycle the PAC Controller, it should send the Cold Start Trap.
Below is the screenshot of the Cold Start trap displayed in the iReasoning program.
IF NEED, E.G. FOR 3RD-PARTY SNMP SOFTWARE,
DOWNLOAD THE MIB FILES FROM OPTO22.COM
The Opto website has a MIB File for SNMP versions 1 and 2.
Download one of these files, probably V2 and save it to your hard drive. The next step is to load it into the iReasoning Browser program.
Opto 22 MIB SNMP Version 1
[B][U]https://www.opto22.com/products/optomib1[/U][/B]
Here is the description for this file:
Opto.mib is a management information base (MIB) file that describes the Opto 22 network objects, such as SNAP Ethernet-based brains or controllers, that can be managed using the Simple Network Management Protocol (SNMP). If you are using SNAP Ethernet systems with an SNMP v1.0-compliant management system, such as Computer Associates’ Unicenter®, Hewlett-Packard’s OpenView®, or IBM’s Tivoli®, you need this free product.
Opto 22 MIB SNMP Version 2
[B][U]https://www.opto22.com/products/optomib2[/U][/B]
Opto.mib is a management information base (MIB) file that describes the Opto 22 network objects, such as SNAP Ethernet-based brains or controllers, that can be managed using the Simple Network Management Protocol (SNMP). If you are using SNAP Ethernet systems with an SNMP v2.0c-compliant management system such as Computer Associates’ Unicenter®, Hewlett-Packard’s OpenView®, or IBM’s Tivoli®, you need this free product.
LOAD THE MIB FILE INTO iREASONING AND READ LIVE DATA
Run the iReasoning MIB Browser software.
Use the File / Load MIBs to load the Opto 22 mib file.
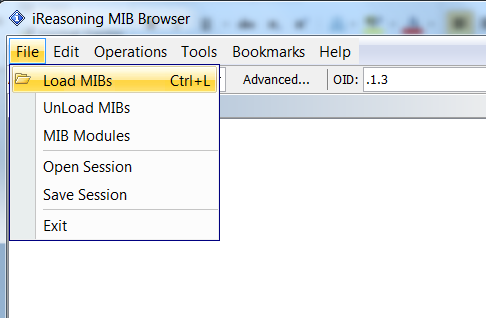
After you load the Opto MIB file you will be able to browse into the Opto data structure as defined by the MIB file.
The following screen shot shows the status digital input that we used for the trap. The OID (Object ID) is shown in the details in the lower part of the screen. Each object in the PAC Controller is defined by the long sequence of numbers that describe the path to that object through the hierarchy of objects.
Here’s a copy of the strategy mentioned above…
NOTE!!!
…use caution when calling that “write setting to flash” code – you will eventually wear out the flash memory on your PAC if called to frequently, for example, in a loop.
SnmpTrapExample.Archive.D10222014.T163637.zip (5.67 KB)
Happy trapping!
-Mary

