TPO Overview
Time Proportional Output (TPO) is a form of pulse-width modulation that allows an analog input signal to control a digital output signal using on/off control to constrain the analog signal. The digital signal is modulated with a time constant from zero to one hundred percent.
In the most basic of descriptions, think of it as a temperature probe in an oven and the TPO is switching the heating element on and off to control the oven temperature to a given set point.
While you can do a crude form of TPO control with simple if-its-cold-turn-on-heater sort of logic, TPO offers both much better temperature control and is more automatic. Once you configure the TPO, it will run on its own.
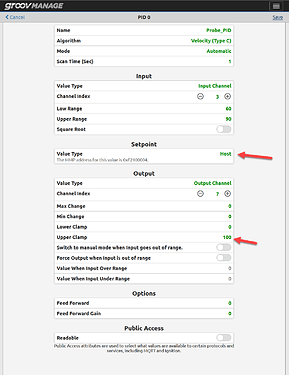
Most times the TPO is controlled by a PID loop. The output of the loop is set to host and is scaled for 0 to 100%. The PID loop will still need to be tuned as all loops should be. The PID set point is the process set point.
The final and critical piece of TPO is the period. What is the span of time that the digital output will be modulated over? Again, this is another tuning parameter that the user will need to adjust for each and every application.
Why must it be tuned? Back to the oven example, a small oven will get up to temperature quicker than a larger one. That volume / heating element efficiency time difference must be taken into account.
TPO on RIO
Ok, so that’s some background, what’s involved in setting this up in a RIO?
Just like the RIO has 4 PID loops built in, 8 of the RIO’s 10 configurable channels support the TPO feature. Note! The two mechanical relays are not supported in TPO mode.
Usually the TPO channel is configured and enabled via PAC Control, but if you need to run TPO on a stand-alone RIO, then you need to use some other programming interface to set up and enable the TPO parameters in the correct way. Enter Node-RED.
You need to know up front that from the user point of view, the TPO function is just a bunch of very specific MMP addresses. Each of the 8 TPO channels has a range of MMP registers that need to be set up with the right values in the right order.
The TPO feature must be enabled on the digital output point, the time period is written to the MMP area for its channel one time, then the 0 to 100% (of the time period) value is sent to another MMP address at the rate of the PID scan rate, and then the RIO MMP processor will do the math and control the digital output in the background for us.
Note that each of the 8 TPO channels on RIO can have different time periods.
Another big note. Do not edit any of the MMP addresses in the Node-RED flow. PAC Control uses the same registers and methods, but the raw MMP addresses are just behind the strategy commands. Randomly writing values to random MMP addresses is never a good idea. It’s no different here.
Getting started
Ok, so let’s get pulsing.
If you have not already started Node-RED, head there in groov Manage and start it… While it’s starting up, from the groov Manage interface set up at least one analog input (of any kind). Scale it for the engineering units your process requires.
Next, from the groov Manage interface, set up your PID loop. Here you are going to set the input to be the analog input channel you just configured and the output will be set to host. This is important because Node-RED will be configured to read the PID output. Be sure and scale the output to be 0 to 100 as per this screenshot.
The scan rate, P, I and D values will need to be tuned. We strongly recommend you review the step-function-response method outlined here: Opto22 - PID: Reaction Curve Tuning for Interactive PID algorithms
Once your analog input and PID loop are configured, you are ready to import the Node-RED flow from this post.
Highlight the text including the first [ and the last ] and copy it to your clipboard.
[{"id":"d4b3b249.8f14a","type":"inject","z":"7a966b2a.f8bdf4","name":"inject","props":[{"p":"payload"}],"repeat":"","crontab":"","once":false,"onceDelay":0.1,"topic":"","payload":"","payloadType":"date","x":1210,"y":600,"wires":[["7a380bae.dd0494"]]},{"id":"7a380bae.dd0494","type":"groov-io-read","z":"7a966b2a.f8bdf4","device":"","dataType":"mmp-address","moduleIndex":"","channelIndex":"","mmpAddress":"0xF08C0000","mmpType":"uint32","mmpLength":"1","mmpEncoding":"ascii","value":"","valueType":"msg.payload","itemName":"","name":"","x":1360,"y":600,"wires":[["264f2278.07b3fe"]]},{"id":"7aeb57c5.139be8","type":"debug","z":"7a966b2a.f8bdf4","name":"","active":true,"tosidebar":true,"console":false,"tostatus":false,"complete":"payload","targetType":"msg","statusVal":"","statusType":"auto","x":1670,"y":600,"wires":[]},{"id":"264f2278.07b3fe","type":"function","z":"7a966b2a.f8bdf4","name":"","func":"// DO NOT MODIFY THE CODE BELOW //\n//\n// -------------------------------- //\n\nTPO_list = [];\n// Turn the incoming decimal into an array of bits\nraw = msg.payload.toString(2).split('');\n// Reading from the right (backwards) each bit represents an active TPO on that channel\n// for example; 00011010 would mean channels 1, 3, and 4 all have TPO active\nfor(i = raw.length-1; i>=0; i--) TPO_list.push((raw[i] == '1') ? true : false);\n// If some channels aren't running, they won't show up in the list at all, so fill that in\nfor(i = raw.length; i < 8; i++) TPO_list.push(false);\n// Return the new array of human-readable boolean values\nreturn { payload : TPO_list };","outputs":1,"noerr":0,"initialize":"","finalize":"","x":1520,"y":600,"wires":[["7aeb57c5.139be8"]]},{"id":"cacf3c06.22fdb8","type":"inject","z":"7a966b2a.f8bdf4","name":"inject","props":[{"p":"payload"}],"repeat":"","crontab":"","once":false,"onceDelay":0.1,"topic":"","payload":"","payloadType":"date","x":1210,"y":220,"wires":[["de90579e.047ae8"]]},{"id":"de90579e.047ae8","type":"change","z":"7a966b2a.f8bdf4","name":"configuration","rules":[{"t":"set","p":"output_name","pt":"msg","to":"Oven_Heater","tot":"str"},{"t":"set","p":"channel_index","pt":"msg","to":"7","tot":"num"},{"t":"set","p":"TPO_period","pt":"msg","to":"2","tot":"num"},{"t":"set","p":"hostname","pt":"msg","to":"opto-04-dc-13","tot":"str"},{"t":"set","p":"apiKey","pt":"msg","to":"Rhs6SWvP7KwkDPup8EbtMU9T42vFJwGg","tot":"str"}],"action":"","property":"","from":"","to":"","reg":false,"x":1350,"y":220,"wires":[["10b8406d.37bcd8"]]},{"id":"10b8406d.37bcd8","type":"function","z":"7a966b2a.f8bdf4","name":"configure channel ","func":"// DO NOT MODIFY THE CODE BELOW //\n//\n// -------------------------------- //\n\n// Headers required for the HTTP request\nmsg.headers = {};\nmsg.headers['accept'] = \"application/json\";\nmsg.headers['apiKey'] = msg.apiKey;\n// groov Manage REST API endpoint URL for channel configuration\nmsg.url = \"https://\" + msg.hostname + \"/manage/api/v1/io/local/modules/0/channels/\" + msg.channel_index + \"/config\";\n// Specific data payload to enable the TPO feature and set the digital output channel type\nmsg.payload = {\n \"name\": msg.output_name,\n \"feature\": 24, // TPO feature\n \"channelType\": '0x' + (2415919227).toString(16), // channel type must be a hex string\n \"unit\": \"\",\n \"watchdogValue\": 0,\n \"watchdogEnabled\": false,\n \"qualityEnabled\": true,\n};\n// Return the headers, url, and payload\nreturn msg;","outputs":1,"noerr":0,"initialize":"","finalize":"","x":1530,"y":220,"wires":[["4135e7db.9d413"]]},{"id":"4135e7db.9d413","type":"http request","z":"7a966b2a.f8bdf4","name":"RESTful HTTP request","method":"PUT","ret":"txt","paytoqs":"body","url":"","tls":"acbc47be.257c2","persist":false,"proxy":"","authType":"","x":1740,"y":220,"wires":[["7957a15c.f7b2b8"]]},{"id":"7957a15c.f7b2b8","type":"function","z":"7a966b2a.f8bdf4","name":"Set TPO period","func":"// DO NOT MODIFY THE CODE BELOW //\n//\n// -------------------------------- //\n\n// MMP address where the TPO period for this specific channel index\nmsg.mmpAddress = '0x' + (0xF08C4004 + (0x30 * msg.channel_index)).toString(16);\n// Use the TPO period configured in the change node to be the next payload\nmsg.payload = msg.TPO_period;\n// Only mmpAddress and a payload are needed, send them out\nreturn msg;","outputs":1,"noerr":0,"initialize":"","finalize":"","x":1360,"y":260,"wires":[["6c33229a.840524"]]},{"id":"6c33229a.840524","type":"groov-io-write","z":"7a966b2a.f8bdf4","device":"","dataType":"mmp-address","moduleIndex":"","channelIndex":"","mmpAddress":"","mmpType":"float","mmpLength":"1","mmpEncoding":"ascii","value":"","valueType":"msg.payload","name":"set float","x":1520,"y":260,"wires":[["7f0a59f2.e88d78"]]},{"id":"7f0a59f2.e88d78","type":"function","z":"7a966b2a.f8bdf4","name":"calculate and set mask","func":"// DO NOT MODIFY THE CODE BELOW //\n//\n// -------------------------------- //\n\nreturn {\n // MMP address for the memory bank that holds TPO control bitmasks\n mmpAddress : \"0xF08C0040\",\n // the bitmask we apply to this address depends on the channel index\n payload : 1 << msg.channel_index\n}","outputs":1,"noerr":0,"initialize":"","finalize":"","x":1700,"y":260,"wires":[["62de2bdf.7f93b4"]]},{"id":"c6cb3767.6a171","type":"comment","z":"7a966b2a.f8bdf4","name":"TPO variable percentage input","info":"NOTE: The \"`msg.channel_index`\" in this _configuration_ change node must match the channel index in the above configuration. This is the index of your digital output point (for example, my point may be called `Oven_Heater`, but this flow needs the channel number 0-7).\n\nThis input should be an analog value in the range 0-100, ideally the output of a PID loop calculated locally. You can find the list of MMP addresses for each of the four PIDs below -- just paste them into the MMP address and you're good to go:\n - PID 0: `0xF210000C`\n - PID 1: `0xF210008C`\n - PID 2: `0xF210010C`\n - PID 3: `0xF210018C`\n\nInjecting into this flow will not do anything until you run the configuration flow above, or if you have the TPO disabled. See the flow below to confirm which channels do (or don't) have an active TPO.\n\nWhile testing you can use the inject nodes to simulate a change of input, but once you have it all working the inject nodes below can be safely deleted.","x":1240,"y":320,"wires":[]},{"id":"3f1c903e.3ca698","type":"function","z":"7a966b2a.f8bdf4","name":"Set TPO percent","func":"// DO NOT MODIFY THE CODE BELOW //\n//\n// -------------------------------- //\n\n// MMP address where the TPO percent for this specific channel index\nmsg.mmpAddress = '0x' + (0xF08C4000 + (0x30 * msg.channel_index)).toString(16);\n// msg.payload should already hold the 0-100 percent value, so forward that along\nreturn msg;","outputs":1,"noerr":0,"initialize":"","finalize":"","x":1610,"y":360,"wires":[["1a25836e.6096b5"]]},{"id":"443e11fc.228798","type":"change","z":"7a966b2a.f8bdf4","name":"configuration","rules":[{"t":"set","p":"channel_index","pt":"msg","to":"7","tot":"num"}],"action":"","property":"","from":"","to":"","reg":false,"x":1410,"y":360,"wires":[["3f1c903e.3ca698"]]},{"id":"62de2bdf.7f93b4","type":"groov-io-write","z":"7a966b2a.f8bdf4","device":"","dataType":"mmp-address","moduleIndex":"","channelIndex":"","mmpAddress":"","mmpType":"uint32","mmpLength":"1","mmpEncoding":"ascii","value":"","valueType":"msg.payload","name":"","x":1900,"y":260,"wires":[[]]},{"id":"1a25836e.6096b5","type":"groov-io-write","z":"7a966b2a.f8bdf4","device":"","dataType":"mmp-address","moduleIndex":"","channelIndex":"","mmpAddress":"","mmpType":"float","mmpLength":"1","mmpEncoding":"ascii","value":"","valueType":"msg.payload","name":"set float","x":1800,"y":360,"wires":[[]]},{"id":"2372c94.eccaf36","type":"comment","z":"7a966b2a.f8bdf4","name":"Run the code below only ONCE (Read me first!)","info":"Before injecting, set the following properties in the “configuration” change node:\n\n - `msg.output_name`: The name of the I/O channel, for example \"Oven_Heater\".\n\n - `msg.channel_index`: The channel index [0-7] that will be wired to the output.\n \n - `msg.TPO_period`: The period of the TPO cycle.\n \n - `msg.hostname`: The device hostname or **STATIC** IP address.\n\n - `msg.apiKey`: A groov Manage API key for a user with groov Manage permissions.","x":1300,"y":180,"wires":[]},{"id":"9a7eddd6.05912","type":"inject","z":"7a966b2a.f8bdf4","name":"","props":[{"p":"payload"}],"repeat":"","crontab":"","once":false,"onceDelay":0.1,"topic":"","payload":"5","payloadType":"num","x":1210,"y":420,"wires":[["443e11fc.228798"]]},{"id":"50f20082.e744c8","type":"inject","z":"7a966b2a.f8bdf4","name":"","props":[{"p":"payload"}],"repeat":"","crontab":"","once":false,"onceDelay":0.1,"topic":"","payload":"55","payloadType":"num","x":1210,"y":460,"wires":[["443e11fc.228798"]]},{"id":"cc78990f.f4567","type":"inject","z":"7a966b2a.f8bdf4","name":"","props":[{"p":"payload"}],"repeat":"","crontab":"","once":false,"onceDelay":0.1,"topic":"","payload":"85","payloadType":"num","x":1210,"y":500,"wires":[["443e11fc.228798"]]},{"id":"ba6d59cb.e1dd28","type":"groov-io-input","z":"7a966b2a.f8bdf4","device":"","dataType":"mmp-address","moduleIndex":"","channelIndex":"","mmpAddress":"0xF210000C","mmpType":"float","mmpLength":"1","mmpEncoding":"ascii","sendInitialValue":true,"deadband":".5","scanTimeSec":"1.0","name":"","x":1210,"y":360,"wires":[["443e11fc.228798"]]},{"id":"57a2cb44.693254","type":"comment","z":"7a966b2a.f8bdf4","name":"Inject this flow to see which channels [0-7] are running a TPO","info":"Note: There may be channels configured with the feature, a non-zero period, and a non-zero percentage, but that does NOT mean it is currently active. If a point is manually written to, the TPO will stop running until it is reactived.\nTo reactivate a configured TPO, just re-run the configuration flow above (the important part is to set the TPO control bitmask for the channel you want to turn on).\n\nIt is also possible that this flow confirms that a point is running but you are not seeing it ever turn on. First, confirm that the percentage you are sending to that channel is currently greater than zero, and note that if it is very small and / or the period is too short then the point may only be on for a very short duration.","x":1340,"y":560,"wires":[]},{"id":"acbc47be.257c2","type":"tls-config","name":"","cert":"","key":"","ca":"","certname":"","keyname":"","caname":"","servername":"","verifyservercert":false}]
Back in groov Mange, open the Node-RED editor and from the top right menu, click import and paste the flow. Click import and we can start setting things up.
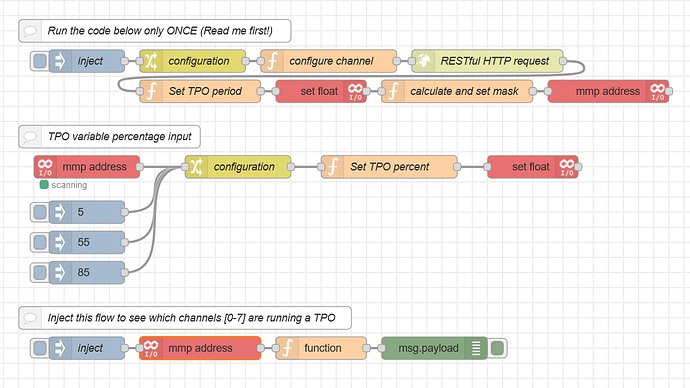
Quick overview: Notice there are three main sections. The larger top flow is the configuration part. You will need to adjust the settings in the yellow change node and run this flow manually one time.
The second smaller flow takes the output from your PID loop and sends the percent to the TPO.
The third and final flow gets an array of TPO channels. (For use in say groov View or a Node-RED dashboard). If you don’t need this status, you can safely delete this part of the flow.
Flow details: Open up the width of your debug tab and click the ‘i’ icon to show node information.
Single click on the top comment block and read the notes in the info tab about setting up the initialization part of the flow.
Configure
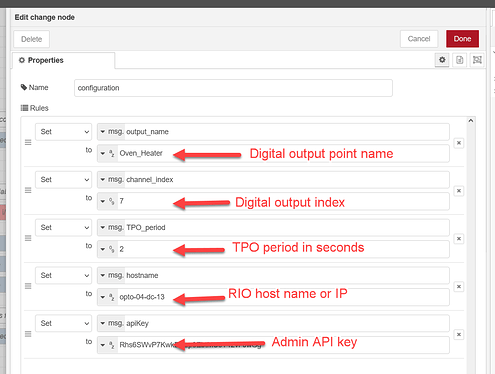
To configure this first part, double click on the yellow change node titled ‘configuration’ and set the 4 parameters. Be sure to only change the parameter values and not the property names. Anything with a msg.____ in front is critical to the code in the flow, but you will need to change their “set to” values to match your requirements.
You first name your digital output point, then set the channel index it will be on (0-7 only), next set the time period, lastly, you need to set your RIO hostname or IP address and add an admin user API key.
For the next smaller part of the flow: Drag in a groov-io node from your pallet and (if you haven’t already) configure the localhost and API key for an admin user.
You also need to set the MMP address of the PID loop you are using. Note you can double click on the comment here and the MMP addresses are in the comment section for you to copy and paste the hex number (including the ‘0x’) into your groov-io node.
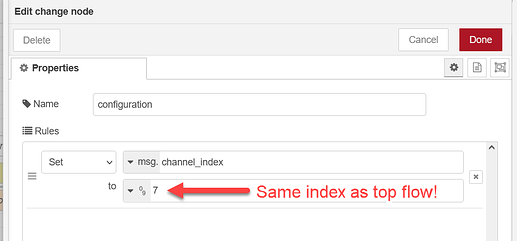
Lastly, it’s critical that you also set your digital output channel number in the yellow change node labeled ‘configuration’. It MUST match the channel number you configured in the top part of the flow.
Now that everything is set up, click deploy and click the first inject at the top left.
This will configure your TPO and if your PID is outputting anything other than zero, you will see your digital point LED on the RIO start to pulse.
If you just want to see things go, you can click on one of the three blue inject nodes in the second part and thus see the output LED flash rate change. Of course if you are confident everything is working, you can delete the three manual inject nodes and clean things up visually.
If you need more than one TPO, copy paste the top two flows and set them up for each channel.
Now it’s just a matter of tuning your PID loop and the TPO period.
One comment on that…. You are using Node-RED to read the 0 to 100% of the PID output, it’s not super high speed. Think carefully about your PID scan rate and your TPO period.
Backup!
Once you have all that done, backup your Node-RED project and I/O settings via the groov Manage Maintenance menu option…. You don’t want to lose track of all that hard work!
Happy coding and pulse on!
P.S While I wrote most of this doc, major kudos needs to be given to @torchard for the code. Could not have happen without him!


