Sparkplug B is an awesome way to go about using MQTT communication, especially in industrial automation applications – but it does come with some extra complexity besides just reading and writing message payloads.
You may have already seen my forum post on decoding Sparkplug B messages using Node-RED (if not, you can check that out here: Decode Sparkplug Encoded MQTT Messages with Node-RED).
In this post I’ll be going over how to create and send control payloads. I’ll go over how to build them, how to encode them, and how to use them to both toggle digital outputs and set analog point values.
The first steps are similar to the decoding post: you’ll need to download and install the Node-RED package node-red-contrib-protobuf in order to encode the outgoing control message, and you will need to download the official protobuf format definition file directly from the Eclipse Tahu GitHub here: sparkplug_b.proto.
Just be sure to download the file with the correct *.proto file extension and not as a *.txt file.
The next part of the setup is to point the encoder node to the protocol definition file. With groov EPIC I recommend uploading the proto file to the unsecured file area using the file system in groov Manage, but if you have shell access you can put it anywhere you want as long as you know the file path.
For the unsecured file area you should use the path /home/dev/unsecured/sparkplug_b.proto and since we are going to be encoding the message payload, the type should be “Payload”:
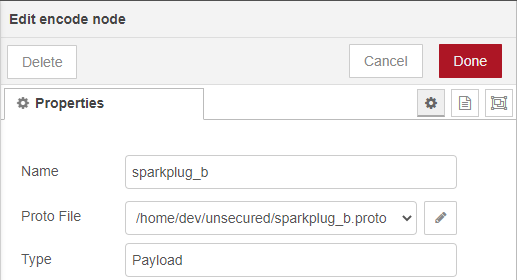
The “Name” field is not critical, but choosing an accurate name like “sparkplug_b” can help keep track of what the node does.
Once this node is correctly configured, the next two things are to figure out the payload format and the topic to publish on. You can find much, much more detail from the official Sparkplug B specification document, but I’ll cover the basics here.
The topic namespace is defined by the following structure:
namespace/group_id/message_type/edge_node_id/[device_id]
For our purposes the namespace and message type will be consistent, but the group, edge node, and device ID’s will all be determined by the device you’re using and how it’s configured:
spBv1.0/(group)/DCMD/(edge_node)/[device_id]
It’s very important that the message type is “DCMD” which represents “Device Command”, also know that “device_id” is an optional field, so that will depend on your settings.
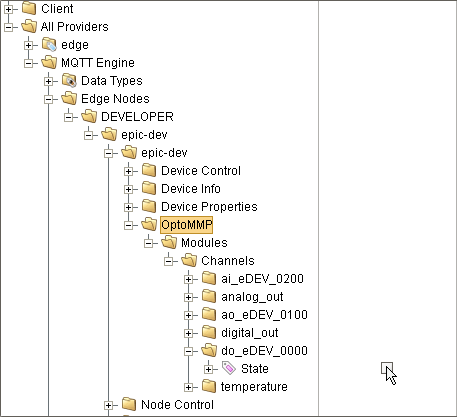
In order to figure out the exact topic namespace, as well as some other details, I highly recommend using both Ignition (the free trial time is more than enough) as well as the decoding method for Node-RED through the link above and reading the Sparkplug payloads to listen in to some initial control messages. That way you can pick up the exact topic and message format by toggling or changing an output like I did here:
In order to trigger this DCMD message you just need to change the output through the Ignition Designer, which you can see here:
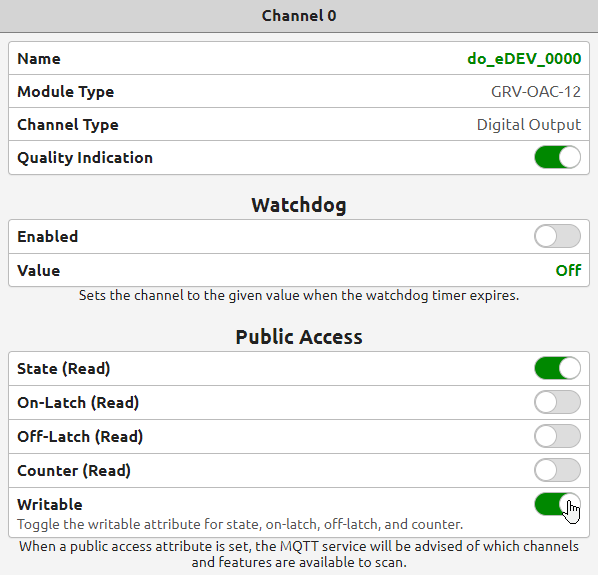
Of course, for this to be available you will need to make sure your point is set to have read/write access enabled through either groov Manage or PAC Control (you can find full setup details in this demo video).
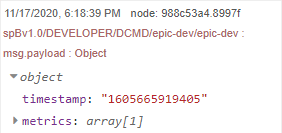
Once the topic is determined, you need to figure out the message payload content. It will follow this general format, but the exact details can be found in the message payload output using the method described above. Here is a debug output of a decoded DCMD message for reference:
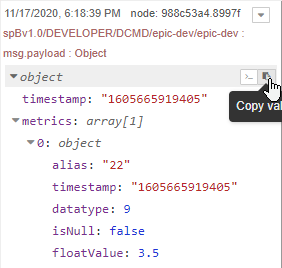
The “alias” field determines the value that you are writing to, which is set with the device birth or “DBIRTH” initial message when you initialize your connection or make another control message. Once you know the alias you should also find the datatype, but you can also find it in section 15.2 (page 51 at the time of writing this post) of the Sparkplug B spec document.
In this case float has the datatype numeration value of 9, and boolean digital toggles have the datatype value of 11. Once you set that and the “floatValue” or “booleanValue” respectively, you should be good to go as long as you replace “writeValue” with either a contant value or a variable that you define in the function node. I personally chose to define writeValue to be an incoming message payload for simplicity (flow import is included at the end of this forum post).
msg.payload = {
"metrics":[{
    "alias":22,
    "datatype":9,
    "isNull":false,
    "floatValue":writeValue
    }],
"seq":-1
};
Once the broker, topic, and payload are all correctly set up, you just need to wire the output into an MQTT out node that is included with Node-RED by default as a part of the core nodes.
Here are both digital and analog write examples:
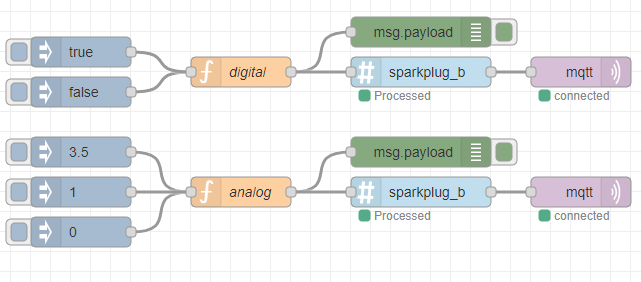
You can import the flow here, just change the specific aliases, datatypes, and write values to your own needs. You can use any source to inject the message besides the “inject” node, just make sure the JSON is correctly formatted before it goes into the Sparkplug encoder node.
Here’s the import JSON for the flows:
[{"id":"e4cfdef8.62409","type":"encode","z":"6dc3f358.26a64c","name":"sparkplug_b","protofile":"6780b84f.200d88","protoType":"Payload","x":610,"y":2620,"wires":[["cbbc13e0.96ac9"]]},{"id":"cbbc13e0.96ac9","type":"mqtt out","z":"6dc3f358.26a64c","name":"","topic":"","qos":"","retain":"","broker":"ec400768.e29c68","x":770,"y":2620,"wires":[]},{"id":"859404f.4cdc6f8","type":"function","z":"6dc3f358.26a64c","name":"digital","func":"time = msg.timestamp;\nwriteValue = msg.payload;\n\nmsg.payload = {\n \"metrics\":[{\n \"alias\":18,\n \"datatype\":11,\n \"isNull\":false,\n \"booleanValue\":writeValue\n }],\n \"seq\":-1\n};\n\nreturn msg;","outputs":1,"noerr":0,"initialize":"","finalize":"","x":430,"y":2620,"wires":[["7a032374.521f2c","e4cfdef8.62409"]]},{"id":"7a032374.521f2c","type":"debug","z":"6dc3f358.26a64c","name":"","active":true,"tosidebar":true,"console":false,"tostatus":false,"complete":"payload","targetType":"msg","statusVal":"","statusType":"auto","x":610,"y":2580,"wires":[]},{"id":"7ce4f61e.007328","type":"inject","z":"6dc3f358.26a64c","name":"","props":[{"p":"payload"},{"p":"topic","vt":"str"},{"p":"timestamp","v":"","vt":"date"}],"repeat":"","crontab":"","once":false,"onceDelay":0.1,"topic":"spBv1.0/DEVELOPER/DCMD/epic-dev/epic-dev","payload":"false","payloadType":"bool","x":270,"y":2640,"wires":[["859404f.4cdc6f8"]]},{"id":"b577b567.6b4f08","type":"inject","z":"6dc3f358.26a64c","name":"","props":[{"p":"payload"},{"p":"topic","vt":"str"},{"p":"timestamp","v":"","vt":"date"}],"repeat":"","crontab":"","once":false,"onceDelay":0.1,"topic":"spBv1.0/DEVELOPER/DCMD/epic-dev/epic-dev","payload":"true","payloadType":"bool","x":270,"y":2600,"wires":[["859404f.4cdc6f8"]]},{"id":"39da79e1.58e276","type":"function","z":"6dc3f358.26a64c","name":"analog","func":"writeValue = msg.payload;\n\nmsg.payload = {\n \"metrics\":[{\n \"alias\":22,\n \"datatype\":9,\n \"isNull\":false,\n \"floatValue\":writeValue\n }],\n \"seq\":-1\n};\n\nreturn msg;","outputs":1,"noerr":0,"initialize":"","finalize":"","x":430,"y":2740,"wires":[["10b44f39.22d771","50182af3.9bf904"]]},{"id":"10b44f39.22d771","type":"debug","z":"6dc3f358.26a64c","name":"","active":true,"tosidebar":true,"console":false,"tostatus":false,"complete":"payload","targetType":"msg","statusVal":"","statusType":"auto","x":610,"y":2700,"wires":[]},{"id":"50182af3.9bf904","type":"encode","z":"6dc3f358.26a64c","name":"sparkplug_b","protofile":"6780b84f.200d88","protoType":"Payload","x":610,"y":2740,"wires":[["29a02be4.eee6b4"]]},{"id":"8bb42f96.a52","type":"inject","z":"6dc3f358.26a64c","name":"","props":[{"p":"payload"},{"p":"topic","vt":"str"},{"p":"timestamp","v":"","vt":"date"}],"repeat":"","crontab":"","once":false,"onceDelay":0.1,"topic":"spBv1.0/DEVELOPER/DCMD/epic-dev/epic-dev","payload":"0","payloadType":"num","x":270,"y":2780,"wires":[["39da79e1.58e276"]]},{"id":"29a02be4.eee6b4","type":"mqtt out","z":"6dc3f358.26a64c","name":"","topic":"","qos":"","retain":"","broker":"ec400768.e29c68","x":770,"y":2740,"wires":[]},{"id":"5d57e5ff.2a092c","type":"inject","z":"6dc3f358.26a64c","name":"","props":[{"p":"payload"},{"p":"topic","vt":"str"},{"p":"timestamp","v":"","vt":"date"}],"repeat":"","crontab":"","once":false,"onceDelay":0.1,"topic":"spBv1.0/DEVELOPER/DCMD/epic-dev/epic-dev","payload":"1","payloadType":"num","x":270,"y":2740,"wires":[["39da79e1.58e276"]]},{"id":"2a7b66bd.eeaa2a","type":"inject","z":"6dc3f358.26a64c","name":"","props":[{"p":"payload"},{"p":"topic","vt":"str"},{"p":"timestamp","v":"","vt":"date"}],"repeat":"","crontab":"","once":false,"onceDelay":0.1,"topic":"spBv1.0/DEVELOPER/DCMD/epic-dev/epic-dev","payload":"3.5","payloadType":"num","x":270,"y":2700,"wires":[["39da79e1.58e276"]]},{"id":"6780b84f.200d88","type":"protobuf-file","z":"","protopath":"/home/dev/unsecured/sparkplug_b.proto","watchFile":false},{"id":"ec400768.e29c68","type":"mqtt-broker","z":"","name":"epic-dev","broker":"epic-dev","port":"1883","clientid":"","usetls":false,"compatmode":false,"keepalive":"60","cleansession":true,"birthTopic":"","birthQos":"0","birthPayload":"","closeTopic":"","closeQos":"0","closePayload":"","willTopic":"","willQos":"0","willPayload":""}]
If you have any questions, or end up using this in any of your projects or applications please drop a message in the thread below.
And as always, happy coding!
