Overview
This example shows how to use some of the Dashboard Nodes in Nodered on the Rio.
The flow for this example is relatively small.
It will require you to install a few nodes (described below). That is the dashboard nodes,Opto ‘s groov-io-nodes and the node-red-node-base64 node.
This example uses the Rio I/O points for an analog input and the two mechanical output relays.
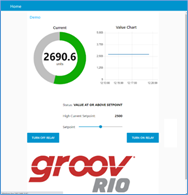
The analog input value is read from the Rio, it is shown on a gauge and graph, it is compared with a setpoint and a message is displayed if the analog input value is above or below the setpoint. The setpoint is adjustable with a slider. There is also buttons to turn off and on the relay, and a Rio logo.
In general, you install the Dashboard nodes into the Nodered environment and then build the flow using the types of graphic object you want on your dashboard; that is gauges, graphs, text, buttons, etc. You use the Dashboard layout screens to create pages within a menu, and for each page you position the graphic objects within a grid pattern to get each page to look nice.
The attached zip file has the flow, the image file, and this document.
Dashboard Nodes
The Dashboard nodes provide the ability to build a live dashboard completely contained within the Nodered package. A graphic objects is represented by a node within the flow. Control is available to customize the look of each graphic object through that nodes properties. Also, the overall appearance can be customized with multiple pages and the ability to position the objects as desired on a grid.
There is a lot available within the entire dashboard suite of nodes. Here is the main web page for information: node-red-dashboard (node) - Node-RED
This example is meant to be simple, so most features have been intentionally left at default values.
Dashboard Display URL
To see the dashboard in your browser, use the URL of the Rio with additional specifics for the Nodered dashboard.
My Rio URL is https://192.168.1.97.
The dashboard is https://192.168.1.97/node-red/ui/
Nodered Node Install
First thing is to install three nodes using the Manage feature (under the pancake icon in the upper right choose Manage Palette, select the Install Tab, and enter the name of the node in the search text box).
The Rio must have Internet Access to be able to complete the installs.
node-red-dashboard
node-red-contrib-groov-io
node-red-node-base64
After the Installation is complete the nodes will appear in the node palette.
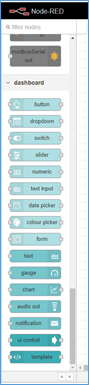
For example, below are the dashboard nodes.
The lighter color nodes are user input objects and the darker ones are display only.
Each dashboard graphic object type is explained in the documentation and I’ve used the default settings for almost everything. To build the dashboard you drag the particular object from the palette onto the workspace, double click that node to configure the various settings, and connect data into (for display types) or out of (for user input types) the node.
The NoderedRed Flow Example
Nodered Flow Explanation
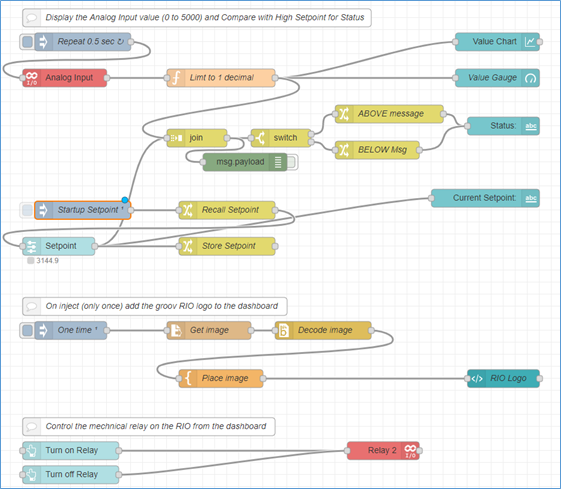
The top part of the flow has the analog input from the Rio being compared to the slider setpoint and outputting the above/below message, as well as a gauge and graph of the analog input value.
The middle section displays the groovRio logo.
The bottom section controls the mechanical relay from a turn on and turn off button.
TOP
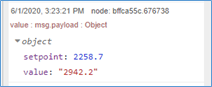
The key to this flow is the join and the switch nodes. The switch node compares the analog input value with the slider setpoint and outputs either the ABOVE or the BELOW message to the dashboard Text node (named Status). The join node combines the analog input value with the slider setpoint into a single message. It does this by using the incoming topic to make a value pair “topic:value”, where the value is the incoming payload. The analog input value topic is set back at the inject node (named Startup Setpoint), and the sliders topic is set in the Slider node (named Setpoint). So the join produces a single message:
SLIDER: It seems the slider object does not display the current value (although I’ve seen it in several examples but could not figure out how to do it), so I added a Text object named Current Setpoint to show the current value.
SLIDER PERSISTANCE- The slider value is persistent because of the Change nodes named Store Setpoint and Recall Setpoint. The setpoint value is stored in the flow context, which remain intact through a power cycle of the Rio or a deploy of a new flow. https://nodered.org/docs/user-guide/context
MIDDLE
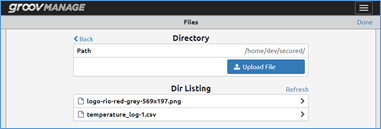
The logo file is stored in the Rio in the /home/dev/secured folder on the solid state drive in the Rio. It was transferred there using groovManage on the System / Files / Secured Files page.
In the flow, the PNG file needs to be converted to base64 encoding, and then it is passed to a Template node, which can contain valid html. Here is an outside forum post with some explanation.
https://discourse.nodered.org/t/ui-template-image-via-msg-payload/4395/15
BOTTOM
The Rio’s mechanical relay is being controlled by the dashboard Button nodes.
The Dashboard Layout Grid
At the upper right on Nodered is a Dashboard Icon, shown in Red below. This gives you access to the dashboard overall settings.
The 3 tabs (in Green) are Layout, Site and Theme. Layout for controlling the size and position of each object, Site for building overall positions and formats, and Theme for setting the style and color.
The user interface is organized in tabs and groups. Tabs are different pages on your user interface, like several tabs in a browser. Inside each tab you have groups that divide the tabs in different sections so that you can organize your graphic objects.
In the screen shot below (in Yellow) you can change the order and size of each object. Drag an object up or down the list to change the order, and add spacers to fill in the blank areas and to keep a row the same width.
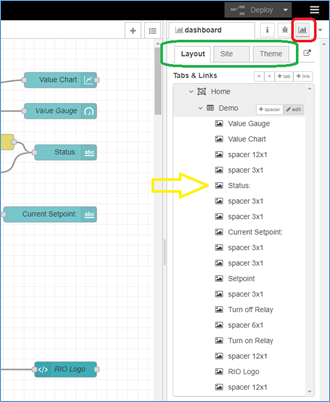
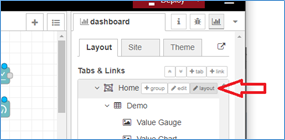
If you click the Layout button by Home, you will see what the entire layout grid looks like with the position of each object. The overall width of the grid can be set here. My grid is set to a width of 12. And then I position the objects with spacers to make each row of the grid add up to 12. For example, the Text object name Status is 6 wide, so I put a 3 spacer on each side of it to place it in the middle of the row, and consume all 12 widths for that row.

NODERED FLOW TO IMPORT
This is also included in the attached zip file as a text file.
[{"id":"70555401.285efc","type":"tab","label":"Example Dashboard","disabled":false,"info":""},{"id":"ec1df03b.eb472","type":"ui_slider","z":"70555401.285efc","name":"","label":"Setpoint","tooltip":"","group":"da148e61.f015f","order":11,"width":6,"height":1,"passthru":true,"outs":"all","topic":"setpoint","min":"0","max":"5000","step":".1","x":100,"y":420,"wires":[["b4b55088.ddab6","7fb70419.7d50bc","4378e087.21f69"]]},{"id":"b4b55088.ddab6","type":"ui_text","z":"70555401.285efc","group":"da148e61.f015f","order":8,"width":6,"height":1,"name":"","label":"Current Setpoint: ","format":"{{msg.payload}}","layout":"row-spread","x":810,"y":340,"wires":[]},{"id":"7fb70419.7d50bc","type":"join","z":"70555401.285efc","name":"","mode":"custom","build":"object","property":"payload","propertyType":"msg","key":"topic","joiner":"\\n","joinerType":"str","accumulate":true,"timeout":"","count":"2","reduceRight":false,"reduceExp":"","reduceInit":"","reduceInitType":"","reduceFixup":"","x":330,"y":240,"wires":[["6b0151f0.ec935","bffca55c.676738"]]},{"id":"6b0151f0.ec935","type":"switch","z":"70555401.285efc","name":"","property":"payload.value","propertyType":"msg","rules":[{"t":"gte","v":"payload.setpoint","vt":"msg"},{"t":"else"}],"checkall":"true","repair":false,"outputs":2,"x":470,"y":240,"wires":[["2ee91675.8faa9a"],["3572dae2.000c56"]]},{"id":"2ee91675.8faa9a","type":"change","z":"70555401.285efc","name":"ABOVE message","rules":[{"t":"set","p":"payload","pt":"msg","to":"VALUE AT OR ABOVE SETPOINT","tot":"str"}],"action":"","property":"","from":"","to":"","reg":false,"x":650,"y":200,"wires":[["d44e2b11.643ea8"]]},{"id":"3572dae2.000c56","type":"change","z":"70555401.285efc","name":"BELOW Msg","rules":[{"t":"set","p":"payload","pt":"msg","to":"VALUE BELOW SETPOINT","tot":"str"}],"action":"","property":"","from":"","to":"","reg":false,"x":630,"y":260,"wires":[["d44e2b11.643ea8"]]},{"id":"d44e2b11.643ea8","type":"ui_text","z":"70555401.285efc","group":"da148e61.f015f","order":5,"width":6,"height":1,"name":"","label":"Status:","format":"{{msg.payload}}","layout":"row-spread","x":840,"y":220,"wires":[]},{"id":"4d6c2c52.3a0324","type":"inject","z":"70555401.285efc","name":"Startup Setpoint","topic":"","payload":"2500","payloadType":"num","repeat":"","crontab":"","once":true,"onceDelay":0.1,"x":140,"y":360,"wires":[["c4f0d7cc.8a1ca8"]]},{"id":"6f793678.f61f98","type":"ui_gauge","z":"70555401.285efc","name":"Value Gauge","group":"da148e61.f015f","order":1,"width":6,"height":6,"gtype":"donut","title":"Current","label":"units","format":"{{value}}","min":"0","max":"5000","colors":["#00b500","#00b500","#ca3838"],"seg1":"","seg2":"","x":830,"y":140,"wires":[]},{"id":"f01bedb4.19081","type":"ui_chart","z":"70555401.285efc","name":"","group":"da148e61.f015f","order":2,"width":6,"height":6,"label":"Value Chart","chartType":"line","legend":"false","xformat":"HH:mm:ss","interpolate":"linear","nodata":"","dot":false,"ymin":"","ymax":"","removeOlder":"15","removeOlderPoints":"","removeOlderUnit":"60","cutout":0,"useOneColor":false,"useUTC":false,"colors":["#1f77b4","#aec7e8","#ff7f0e","#2ca02c","#98df8a","#d62728","#ff9896","#9467bd","#c5b0d5"],"useOldStyle":false,"outputs":1,"x":830,"y":80,"wires":[[]]},{"id":"92f3743d.d87d68","type":"inject","z":"70555401.285efc","name":"One time","topic":"","payload":"","payloadType":"date","repeat":"","crontab":"","once":true,"onceDelay":"1","x":120,"y":560,"wires":[["cb201fea.2aa1d"]]},{"id":"2ddcd9a1.a6f3c6","type":"template","z":"70555401.285efc","name":"Place image","field":"payload","fieldType":"msg","format":"handlebars","syntax":"mustache","template":"<img src=\"data:image/png;base64,{{payload}}\"style=\"width=\"180\" height=\"180\"\"/>","output":"str","x":370,"y":640,"wires":[["1206395b.419077"]]},{"id":"1206395b.419077","type":"ui_template","z":"70555401.285efc","group":"da148e61.f015f","name":"RIO Logo","order":17,"width":12,"height":4,"format":"<div ng-bind-html=\"msg.payload\"></div>","storeOutMessages":true,"fwdInMessages":true,"resendOnRefresh":false,"templateScope":"local","x":840,"y":640,"wires":[[]]},{"id":"cb201fea.2aa1d","type":"file in","z":"70555401.285efc","name":"Get image","filename":"/home/dev/secured/logo-rio-red-grey-569x197.png","format":"","chunk":false,"sendError":false,"encoding":"none","x":350,"y":560,"wires":[["b700e6dc.9658a8"]]},{"id":"b700e6dc.9658a8","type":"base64","z":"70555401.285efc","name":"Decode image","action":"","property":"payload","x":540,"y":560,"wires":[["2ddcd9a1.a6f3c6"]]},{"id":"8cc855e2.445d78","type":"comment","z":"70555401.285efc","name":"On inject (only once) add the groov RIO logo to the dashboard","info":"","x":260,"y":520,"wires":[]},{"id":"c73b3c44.c6a2e","type":"ui_button","z":"70555401.285efc","name":"","group":"da148e61.f015f","order":15,"width":3,"height":1,"passthru":false,"label":"Turn on Relay","tooltip":"","color":"","bgcolor":"","icon":"","payload":"true","payloadType":"bool","topic":"","x":120,"y":760,"wires":[["40341b6.fabc3e4"]]},{"id":"19c74d49.4dc163","type":"comment","z":"70555401.285efc","name":"Control the mechnical relay on the RIO from the dashboard","info":"","x":250,"y":720,"wires":[]},{"id":"40341b6.fabc3e4","type":"groov-io-write","z":"70555401.285efc","device":"86920c38.358db","dataType":"channel-digital","moduleIndex":"0","channelIndex":"9","mmpAddress":"0xF0D81000","mmpType":"int32","mmpLength":"1","mmpEncoding":"ascii","value":"","valueType":"msg.payload","name":"Relay 2","x":640,"y":760,"wires":[[]]},{"id":"1469b614.46fe5a","type":"ui_button","z":"70555401.285efc","name":"","group":"da148e61.f015f","order":13,"width":3,"height":1,"passthru":false,"label":"Turn off Relay","tooltip":"","color":"","bgcolor":"","icon":"","payload":"false","payloadType":"bool","topic":"","x":120,"y":800,"wires":[["40341b6.fabc3e4"]]},{"id":"1c4e56b3.30b219","type":"comment","z":"70555401.285efc","name":"Display the Analog Input value (0 to 5000) and Compare with High Setpoint for Status","info":"","x":330,"y":40,"wires":[]},{"id":"d2028433.c5e938","type":"groov-io-read","z":"70555401.285efc","device":"86920c38.358db","dataType":"channel-analog","moduleIndex":"0","channelIndex":"2","mmpAddress":"0xF0D81000","mmpType":"int32","mmpLength":"1","mmpEncoding":"ascii","value":"","valueType":"msg.payload","itemName":"","name":"Analog Input","x":110,"y":140,"wires":[["617e4d92.7bdcd4"]]},{"id":"522d4c3a.460314","type":"inject","z":"70555401.285efc","name":"Repeat 0.5 sec","topic":"value","payload":"","payloadType":"date","repeat":"0.5","crontab":"","once":false,"onceDelay":0.1,"x":140,"y":80,"wires":[["d2028433.c5e938"]]},{"id":"617e4d92.7bdcd4","type":"function","z":"70555401.285efc","name":"Limt to 1 decimal","func":"msg.payload = msg.payload.toFixed(1);\nreturn msg;","outputs":1,"noerr":0,"x":370,"y":140,"wires":[["f01bedb4.19081","6f793678.f61f98","7fb70419.7d50bc"]]},{"id":"bffca55c.676738","type":"debug","z":"70555401.285efc","name":"","active":false,"tosidebar":true,"console":false,"tostatus":false,"complete":"false","x":410,"y":280,"wires":[]},{"id":"4378e087.21f69","type":"change","z":"70555401.285efc","name":"Store Setpoint","rules":[{"t":"set","p":"setpoint","pt":"flow","to":"payload","tot":"msg"}],"action":"","property":"","from":"","to":"","reg":false,"x":380,"y":420,"wires":[[]]},{"id":"c4f0d7cc.8a1ca8","type":"change","z":"70555401.285efc","name":"Recall Setpoint","rules":[{"t":"set","p":"payload","pt":"msg","to":"setpoint","tot":"flow"}],"action":"","property":"","from":"","to":"","reg":false,"x":380,"y":360,"wires":[["ec1df03b.eb472"]]},{"id":"da148e61.f015f","type":"ui_group","z":"","name":"Demo","tab":"da5706ae.6caf58","order":3,"disp":true,"width":"12","collapse":false},{"id":"86920c38.358db","type":"groov-io-device","z":"","address":"localhost","msgQueueFullBehavior":"DROP_OLD"},{"id":"da5706ae.6caf58","type":"ui_tab","z":"","name":"Home","icon":"dashboard","disabled":false,"hidden":false}]
File Attachment -
RIO DASHBOARD USER INTERFACE EXAMPLE USING NODERED.zip (330.4 KB)