Path to 'httpStatic' on Opto22 Groov RIO

I can’t seem to get the path to ‘httpStatic’ figured out using the Node-RED that comes pre-installed on the RIO… I’ve setup and used ‘httpStatic’ many times on the Node-RED installs I’ve done on Raspberry Pi’s and Windows Server without issue.

The one difference I see in this pre-installed setup on the RIO is that it is using…

httpRoot: '/node-red'

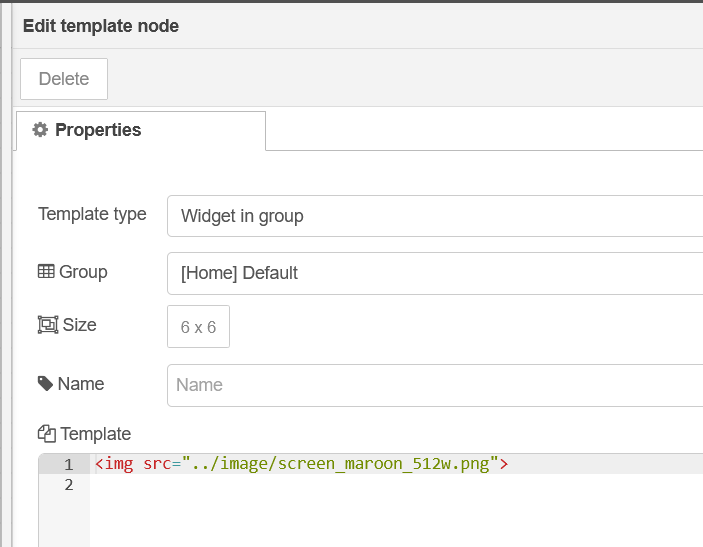
…and I have ‘httpStatic’ set as shown below…

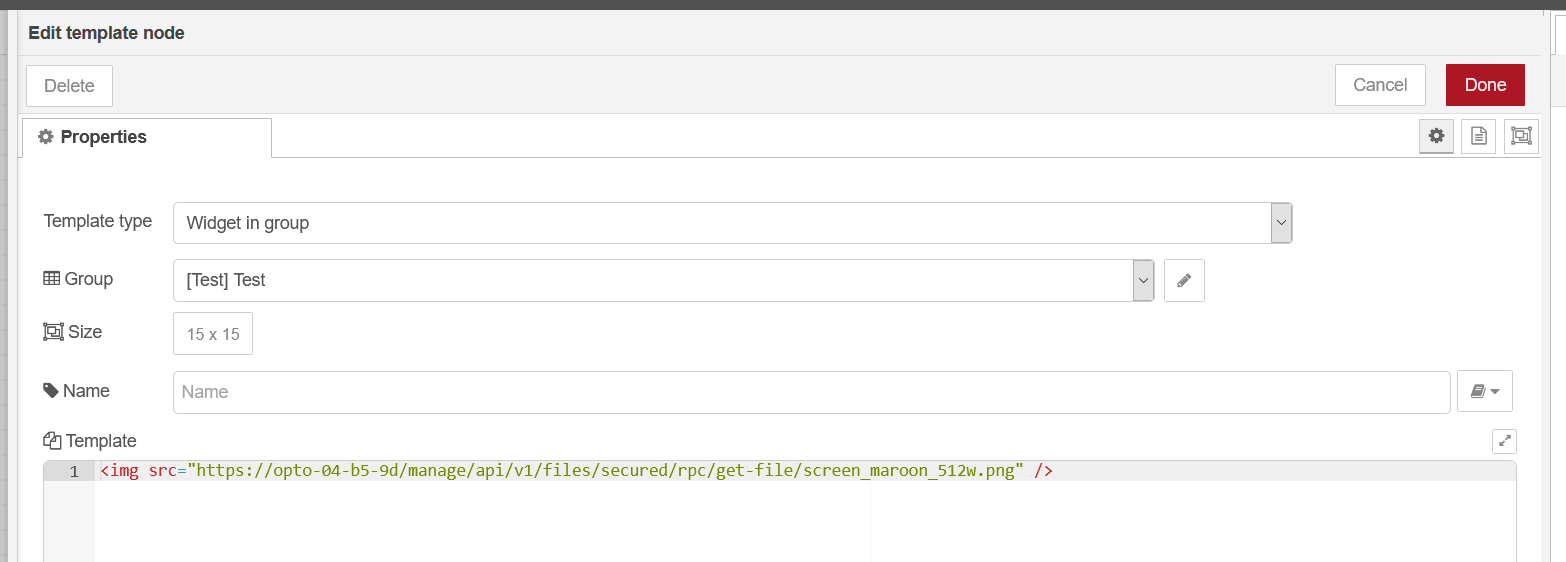
httpStatic: '/home/dev/secured'

The Node-RED UI is available at (I generically inserted ‘ip_address’ for this post)…

https://ip_address/node-red/

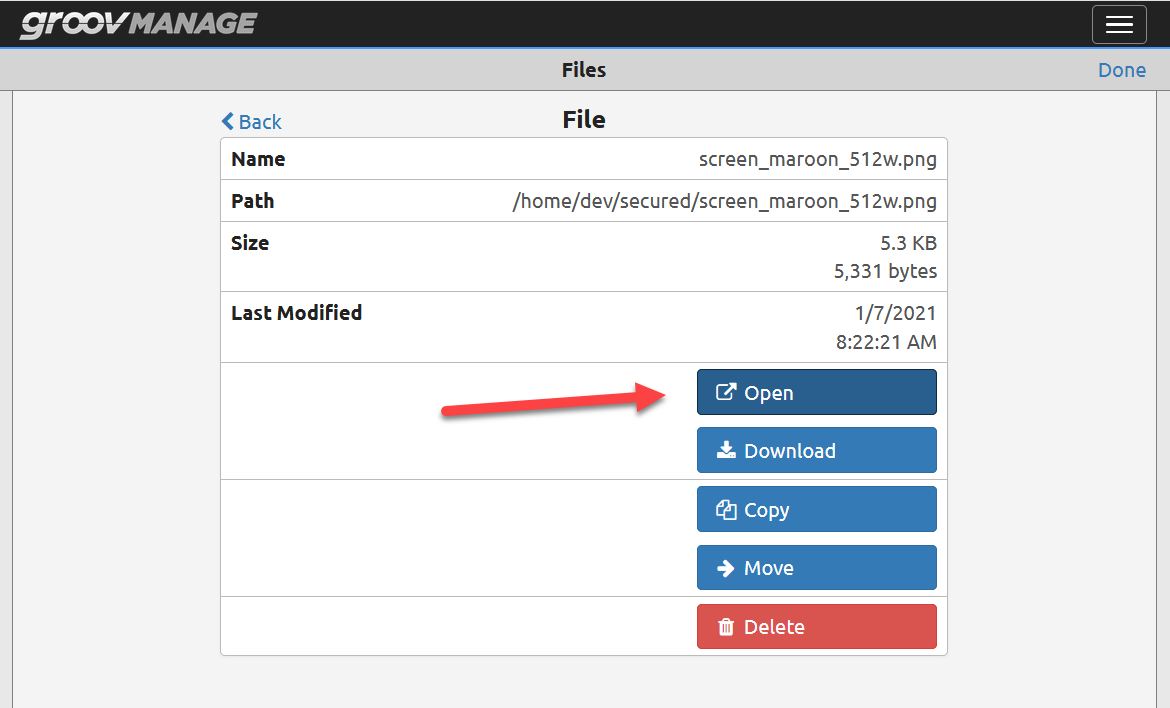
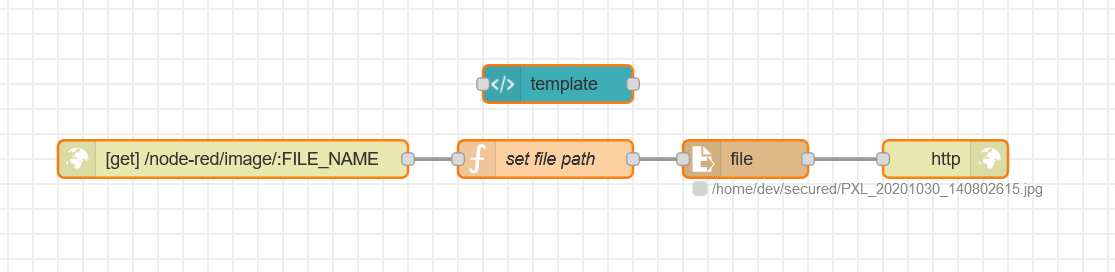
I’ve tried to access the png file (which is located in the ‘httpStatic’ path) I want to display at…

https://ip_address/filename.png

…but I just get a 404 Not Found / nginx/1.15.2 error message.

Oh, and yes, I have restarted the Node-RED server after updating the settings.js file… you can see the top of the log file after Node-RED starts back up and everything looks ok.

Welcome to Node-RED
===================
6 Jan 00:41:06 - [info] Node-RED version: v1.1.3
6 Jan 00:41:06 - [info] Node.js version: v10.16.3
6 Jan 00:41:06 - [info] Linux 4.19.37-rt19-g3819971626 arm LE
6 Jan 00:41:22 - [info] Loading palette nodes
6 Jan 00:42:18 - [info] Dashboard version 2.26.1 started at /node-red/ui
6 Jan 00:42:22 - [info] Settings file : /usr/share/nxtio/services/node-red/settings.js
6 Jan 00:42:22 - [info] HTTP Static : /home/dev/secured
6 Jan 00:42:22 - [info] Context store : 'default' [module=memory]
6 Jan 00:42:22 - [info] User directory : /home/dev/.node-red
6 Jan 00:42:22 - [warn] Projects disabled : set editorTheme.projects.enabled=true to enable
6 Jan 00:42:22 - [info] Flows file : /home/dev/.node-red/flows.json
6 Jan 00:42:22 - [info] Server now running at http://127.0.0.1:1880/node-red/
6 Jan 00:42:22 - [info] Starting flows

Does anyone have any ideas on this?

Am I missing something obvious?

I can take a look at this… what Node are you using to display the png on the dashboard?

I would like to simply use a dashboard template node… I already have it functioning the way I want on Windows Server so I assumed I could just export from Node-RED on the Windows Server and import into Node-RED on the RIO… but I haven’t been able to figure it out thus far?

Below is the dashboard template node that works on my Windows Server setup.

[{"id":"1fbcde95.56a451","type":"ui_template","z":"20a0c6b7.8473ea","g":"837caa6a.530068","group":"c55723aa.ac82d","name":"Logo / Clock","order":1,"width":0,"height":0,"format":"<script>\n\n    var clockInterval;\n    \n    $(function() {\n        \n        if (clockInterval) return;\n\n        //add logo\n        var logo = new Image();\n        logo.src = '/IoAT (White).png';\n        logo.height = 45;\n        \n        var div1 = $('<div/>');\n        div1[0].style.margin = '10px auto';\n        div1.append(logo);\n\n        //add clock\n        var p = $('<p/>');\n        p[0].style['font-family'] = 'monospace';\n        \n        var div2 = $('<div/>');\n        div2[0].style.margin = '5px';\n        div2[0].style['text-align'] = 'right';\n        div2.append(p);\n\n        function displayTime() {\n            p.text(new Date().toLocaleString());\n        }\n        \n        clockInterval = setInterval(displayTime, 1000);\n\n        //add to toolbar when it's available\n        var addToToolbarTimer;\n        \n        function addToToolbar() {\n            \n            var toolbar = $('.md-toolbar-tools');\n            \n            if(!toolbar.length) return;\n            \n            toolbar[0].style.display = 'grid'; \n            toolbar[0].style['grid-template-columns'] = '1fr 1fr 1fr';\n            \n            toolbar.append(div1);\n            toolbar.append(div2);\n            \n            clearInterval(addToToolbarTimer);\n            \n        }\n        \n        addToToolbarTimer = setInterval(addToToolbar, 100);\n        \n    });\n    \n</script>","storeOutMessages":true,"fwdInMessages":true,"resendOnRefresh":false,"templateScope":"global","x":1010,"y":3860,"wires":[["980c33c6.44fa4","87bea7c7.2355a8","9cff0ee7.8899"]]},{"id":"c55723aa.ac82d","type":"ui_group","name":"Run Process","tab":"b44f469b.977698","order":6,"disp":true,"width":"6","collapse":false},{"id":"b44f469b.977698","type":"ui_tab","name":"Y-Press Dashboard","icon":"dashboard","order":1,"disabled":false,"hidden":false}]

Thanks for taking a look.

Ok… so… a few things here…

Firstly, you have spaces in your logo path…

logo.src = '/IoAT (White).png';

That’s a big no-no in Linux. No spaces or punctuation, dashes or under-bars only in URL paths.

Secondly, we don’t use any of the settings.js settings. We don’t expect everyone to have shell access and thus need to change it just to put an image on a Node-RED dashboard.
So you can undo any changes you made to that file.

Here is how to display a static image on a Node-RED dashboard on either EPIC or RIO.

Upload your logo image via groov Manage file area as usual.
Then click on ‘Open’.

The image will open in a new tab in your browser. Copy the ULR. That’s what you need to paste into your template node.
Here is my example;

You can see, in this case where I just want to place an image on a dashboard page we just put the image url between an ‘img’ html tag with the src address as the one we copied from the new browser tab that showed the image.

That should get the image displayed on the dashboard node that you want.

Lastly, your code did not put the clock in the title bar for me…It just threw it in the left side - middle of the page Not sure why, it just seemed broken.
So I fixed it to work for me (on the RIO).

Here is the code; (You will need to change the logo URL to match your groov Manage one).

[{"id":"7aaa0a5c.b25aa4","type":"ui_template","z":"1e6e177.5b94369","group":"72ea7212.9e3cd4","name":"Logo / Clock","order":1,"width":"1","height":"1","format":"<script id=\"titleScript\" type=\"text/javascript\">\n \n //add logo\n var logo = new Image();\n logo.src = 'https://opto-04-b5-9d/manage/api/v1/files/secured/rpc/get-file/screen_maroon_512w.png';\n logo.height = 45;\n \n var div1 = $('<div/>');\n div1[0].style.margin = '10px auto';\n div1.append(logo);\n \n \n \n //add clock\n $('#clock').remove();\n var toolbar = $('.md-toolbar-tools');\n var div = $('<div/>');\n var p = $('<p/ id=\"clock\">');\n \n $('#titleScript').parent().hide();\n div.append(p);\n div[0].style.margin = '5px 5px 5px auto';\n toolbar.append(div);\n\n function displayTitle(lh) {\n p.text(lh); \n }\n \n function upTime() {\n var d = new Date();\n p.text(d.toLocaleTimeString('de-AT'));\n }\n\n \n toolbar.append(div);\n toolbar.append(div1);\n\n // Watch the payload and update the title\n (function(scope) {\n scope.$watch('msg.payload', function(data) {\n displayTitle(data);\n });\n setInterval(upTime,1000);\n })(scope);\n</script>","storeOutMessages":true,"fwdInMessages":true,"resendOnRefresh":false,"templateScope":"local","x":1190,"y":700,"wires":[[]]},{"id":"72ea7212.9e3cd4","type":"ui_group","z":"","name":"Test","tab":"a5c08b9b.2e52d","order":1,"disp":true,"width":"15","collapse":false},{"id":"a5c08b9b.2e52d","type":"ui_tab","z":"","name":"Test","icon":"dashboard","disabled":false,"hidden":false}]

That’s a big no-no in Linux. No spaces or punctuation, dashes or under-bars only in URL paths.

Yeah, I’m aware of the space issue you pointed out and I tried it every which way imaginable (%20, etc)… but it didn’t make a difference.

Using the URL from the RIO → System → Files link is the simple, obvious solution I was missing… can’t believe I didn’t think of that, LOL. :man_facepalming:

I would still like to understand why the ‘httpStatic’ path didn’t function as expected… even though doing it the way you pointed out means I don’t have to modify the ‘settings.js’ file at all.

As for the title bar formatting… the difference was the fact that I had the ‘hamburger’ menu turned off on my setup… but since you noticed an issue, I will re-factor some so it works for me either way.

Thanks again for the help.

The httpStatic did not work because we do an Nginx redirect on the whole RIO/EPIC to make Node-RED work with the same SSL certificate as groov Manage.

Ah, no hamburger… I missed that since I imported your flow to a current project that had a few pages.
Just skip my code and go with yours.

Thanks for explaining.

I thought you might enjoy seeing the dashboard I’ve been working on… Node-RED is used to talk to a PLC via Modbus and the Groov RIO I/O and then present a user control dashboard for an in-house designed machine we use to make superabrasive grinding wheels.

I love the EPIC and the RIO and I love Node-RED too… thanks for continuing to innovate in the industrial controls space!

4 Likes

WOW! That looks fantastic!
Nice work. Thanks very much for the share.

@Beno I ran into a wrinkle with this solution… it only works for an admin account. A regular user account on the RIO doesn’t seem to have access to ‘/home/dev/secured/’.

There is an option within the user panel to grant Node-RED access to a non-admin user. I can pull the page up no problem as the non-admin user… but it won’t load the image because it can’t access it.

Uh. Yeah. Ok.
We will (hopefully) fix this in a future firmware update, heavy on the word future…

For now, here is the work around. (This sample flow is from the RIO software engineer - tested just now by me - just so we are clear, no way known I could have come up with this auwsome solution!)

As a RIO admin user, upload any image that you want included on the dashboard.
Take a copy/paste of just the image file name. Don’t worry about opening it in a browser this time, we just need the Linux approved image file name.

Import the following flow.

Note I have included the template node again - for the sake of completeness. But you can just tweak your existing one if you like.

Here is the flow.

[{"id":"66277137.9b285","type":"http in","z":"1e6e177.5b94369","name":"","url":"/image/:FILE_NAME","method":"get","upload":false,"swaggerDoc":"","x":580,"y":920,"wires":[["1e004bb6.4b1fe4"]]},{"id":"f7a1d1cc.c0374","type":"file in","z":"1e6e177.5b94369","name":"","filename":"","format":"","x":990,"y":920,"wires":[["2a15af10.99d45"]]},{"id":"2a15af10.99d45","type":"http response","z":"1e6e177.5b94369","name":"","statusCode":"","headers":{},"x":1150,"y":920,"wires":[]},{"id":"1e004bb6.4b1fe4","type":"function","z":"1e6e177.5b94369","name":"set file path","func":"\nmsg.filename = '/home/dev/secured/' + msg.req.params.FILE_NAME;\n\nreturn msg;","outputs":1,"noerr":0,"initialize":"","finalize":"","x":830,"y":920,"wires":[["f7a1d1cc.c0374"]]},{"id":"7d32792c.baf7","type":"ui_template","z":"1e6e177.5b94369","group":"a79e5f63.87663","name":"","order":1,"width":"6","height":"6","format":"<div ng-bind-html=\"msg.payload\"></div>\n\n<img src=\"../image/PXL_20201030_140802615.jpg\">\n","storeOutMessages":true,"fwdInMessages":true,"resendOnRefresh":true,"templateScope":"local","x":840,"y":860,"wires":[[]]},{"id":"a79e5f63.87663","type":"ui_group","z":"","name":"Default","tab":"3d325be7.304d8c","order":2,"disp":true,"width":"6","collapse":false},{"id":"3d325be7.304d8c","type":"ui_tab","z":"","name":"Home","icon":"dashboard","disabled":false,"hidden":false}]

What you are doing is creating a Node-RED user permitted endpoint that is getting the image from /home/dev/secured/.
When you open the dashboard it gets the image name from the groov Manage file area and serves it up to the Node-RED dashboard node. All this is done at the same user ID level, so there are no permission issues.
Just keep the image path in your template Node the same as the flow imported it. ie, this;

1 Like

Serving the image up using a Node-RED http endpoint worked like a charm… thanks!

Yay. Thanks for letting us know.
Good to have a solid workaround.