A customer asked me how to get a Raspberry Pi camera image into groov… here is one way.
Let us all know if you find another or you try this way and what you find.
Hardware wise, with the Pi powered off, connect the ribbon cable and camera.
Follow a guide on line if you are not sure how to get that done.
First thing to do software wise is to install Node-RED on your Pi.
The latest build of Raspbian comes with Node-RED, but its an old version and must be updated.
From a terminal (PuTTY or SSH) run the following command (if you don’t have Node-RED installed, this will install Node-RED, so either way, you are covered.);
bash <(curl -sL https://raw.githubusercontent.com/node-red/raspbian-deb-package/master/resources/update-nodejs-and-nodered)
Then enable Node-red to start as a service when the Pi boots up;
sudo systemctl enable nodered.service
Now enable the Raspberry Pi Camera;
sudo raspi-config
Select Option 5, Interfacing Options and then P1 Camera.
When you are offered to reboot, reboot.
Next, at the command prompt still, install the Python Pi camera library;
sudo pip install picamera
Ok, now hit your Pi’s IP/Hostname:1880 and you will the Node-RED editor.
If you have never used Node-RED before, check out our intro video, well worth your time…
Second last step is to install the Raspberry Pi Camera node.
Click on the three bar menu on the top right, select ‘Manage Palette’, Then select the Install tab and search for camerapi
There will be one node appear, install it.
From here, you can find your own way, or use this example flow, copy paste it, and then do an import flow from the same menu;
[{"id":"a5126767.fbdcc8","type":"http in","z":"b3c9fff1.e7df","name":"","url":"/image","method":"get","upload":false,"swaggerDoc":"","x":136,"y":120,"wires":[["f7e9aa97.c1b9e8"]]},{"id":"f7e9aa97.c1b9e8","type":"camerapi-takephoto","z":"b3c9fff1.e7df","filemode":"0","filename":"","filedefpath":"1","filepath":"","fileformat":"jpeg","resolution":"2","rotation":"180","fliph":"0","flipv":"0","brightness":"50","contrast":"0","sharpness":"0","imageeffect":"none","name":"","x":390,"y":119,"wires":[["ff940246.fff43"]]},{"id":"ff940246.fff43","type":"http response","z":"b3c9fff1.e7df","name":"","statusCode":"","headers":{"content-type":"image/png"},"x":643,"y":113,"wires":[]}]
Here is how it looks;
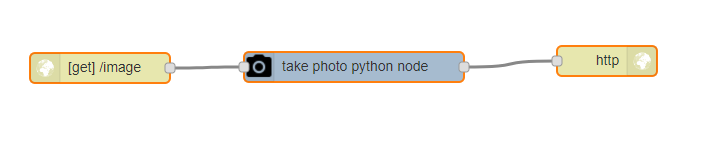
We use the HTTP Node to listen on our Pi’s IP address:1880/image (Hit that address from your web browser to return an image, every browser refresh will serve up a new image - it’s a quick way to test the flow).
To be clear, every time we have a hit on that URL, it triggers the Pi to take an image and send it to the URL.
So, when we put that URL in the groov Camera Gadget, it will hit that URL at the refresh rate we have set and there will be a new image from the Pi camera show up in groov.
Here, I have set the IP address of my pi, the Node-RED port and the image URL and I get a new image every two minutes.
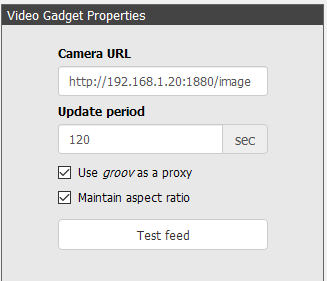
Be sure and use the Proxy option so you do not need to do any port forwards to the Pi with the camera.
Of course, if you want an event, like a digital input to take the picture, you can do that by swapping out the http node with a SNAP PAC node. Much fun!